Notes app — Asynchronous communication with Kafka
I find the world of event-driven programming a really interesting topic: it gives you robust traceability of operations and a system that is considerably resilient to failures.
In this article we’ll see how to integrate Kafka into a Spring project, and we’ll briefly introduce what the tool is used for and the partial justification for using it in this project.
Introduction to Kafka
To get a general idea of Kafka, it’s a robust solution to the need for an event system. Broadly speaking, you need to understand the following three main concepts:
- Consumer: a node that consumes events.
- Producer: a node that publishes events.
- Topic: a category or channel where published events are grouped.

Theoretically, Kafka’s whole infrastructure and how they make the solution so scalable and robust is quite interesting, but, as a summary, we’ll use it for asynchronous communication in our application: this way we’ll reduce latency and gain fault tolerance, since if the part of our application that depends on Kafka fails, Kafka will take care of retrying the failed event.
Starting an Apache Kafka server
The first thing we need is a Kafka server, so we’ll use Docker Compose to spin up our own:
services:
  zookeeper:
    image: confluentinc/cp-zookeeper:latest
    container_name: zookeeper
    environment:
      ZOOKEEPER_CLIENT_PORT: 2181
      ZOOKEEPER_TICK_TIME: 2000
    ports:
      - "2181:2181"

  kafka:
    image: confluentinc/cp-kafka:latest
    container_name: kafka
    ports:
      - "9092:9092"
    environment:
      KAFKA_BROKER_ID: 1
      KAFKA_ZOOKEEPER_CONNECT: zookeeper:2181
      KAFKA_ADVERTISED_LISTENERS: PLAINTEXT://localhost:9092
      KAFKA_OFFSETS_TOPIC_REPLICATION_FACTOR: 1
    depends_on:
      - zookeeper
Kafka uses Zookeeper to handle the coordination of its nodes (brokers) and to make sure the data is properly distributed and replicated.
With this service available, we can now go to Spring and add our dependency in the pom:
<dependency>
  <groupId>org.springframework.kafka</groupId>
  <artifactId>spring-kafka</artifactId>
</dependency>
We add the connection URL in the corresponding properties file:
spring.kafka.bootstrap-servers=localhost:9092Practical case
In our application we have two databases: one for users in PostgreSQL, where all their personal information is stored, and another for notes in Mongo. If we delete a user, it will be done from the users service, which is connected to PostgreSQL, and that service will in turn publish a deletion event so the notes microservice takes care of handling it.
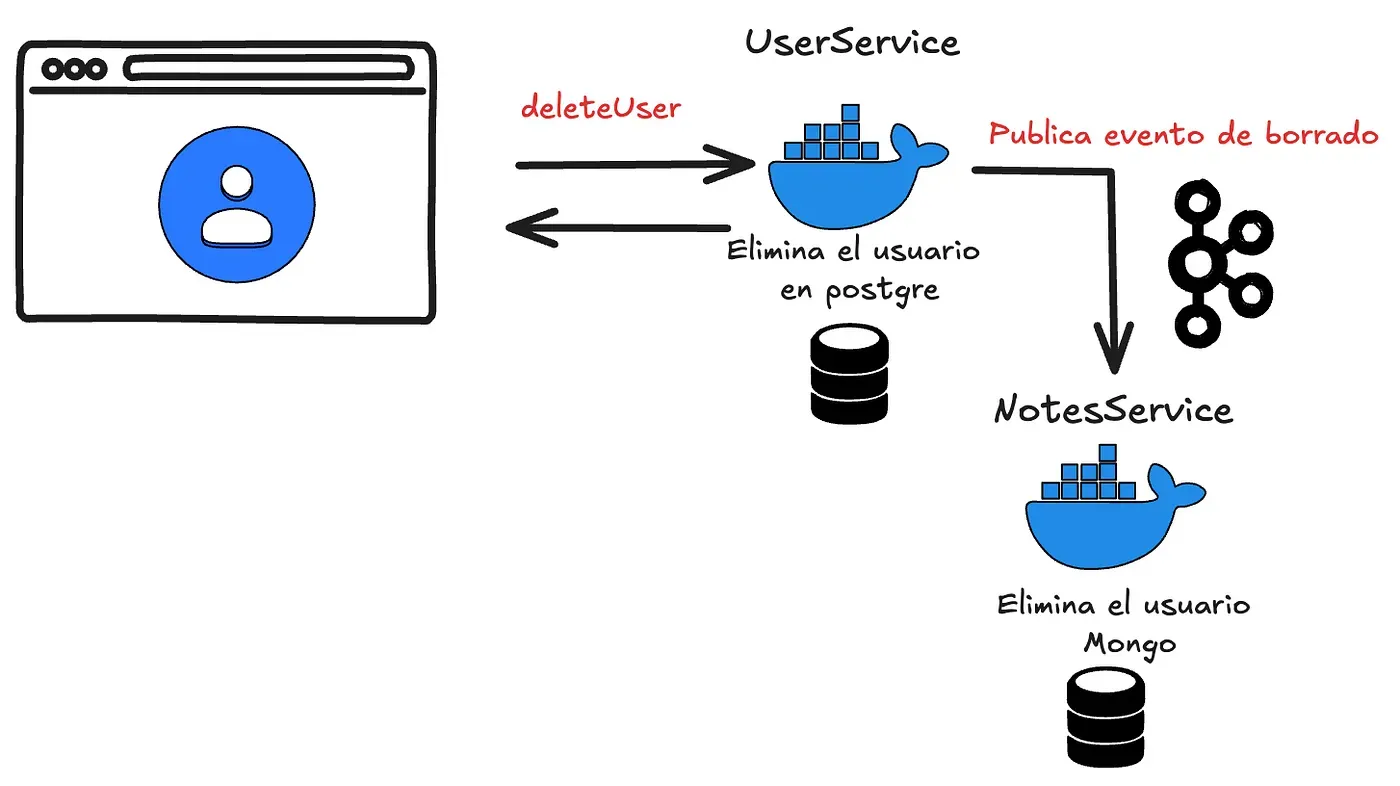
- Users microservice: will be our publisher of the deletion event.
- Notes microservice: will consume the event to delete the user’s notes.
This way we’ll have the following logic in our delete-user controller (the right place for it is a service, but for the example I want the flow to be visible):
@RestController
@RequestMapping("/commands")
@RequiredArgsConstructor
public class UserCommandsController {
    private final UserCommandRepository userRepository;
    private final KafkaProducer kafkaProducer;

    @DeleteMapping("/{username}")
    public ResponseEntity<String> deleteUser(@PathVariable String username) {
        userRepository.deleteById(username);
        kafkaProducer.sendMessage("Delete user: " + username);
        return ResponseEntity.ok().body("User deleted");
    }
}
And on the other side, in our notes microservice, we’ll create a consumer for the event:
package com.nicovegasr.notes_service.kafka;

import org.springframework.kafka.annotation.KafkaListener;
import org.springframework.stereotype.Service;

@Service
public class KafkaConsumer {

    @KafkaListener(topics = "user_deletion_topic", groupId = "group_id")
    public void consume(String username) {
        System.out.println("Received message: " + username);
    }
}
This way we can verify it works and, instead of printing the value, we’ll use the microservice to delete all the notes and folders associated with the user.
If you want to follow the project’s progress, you can check out the repository here.