Gradle — Speed, modularity and control in your builds
In the J2EE ecosystem it’s common to use Maven or Gradle to automate the build process. Sometimes we take for granted that these tools are magic and we just need to run a command such as gradlew clean build, but how do they work, and what can we actually do with them?
Maven and Gradle are build-automation tools: they compile code, package applications, manage dependencies, and run test classes.
Maven is XML-based, while Gradle relies on a concise DSL written in Groovy or Kotlin and is newer than Maven. Despite the differences between them, both can accomplish nearly the same tasks. However, as Gradle is newer, it offers greater flexibility and power; features like incremental builds and lazy configuration can shave minutes off large projects.
Gradle behind the scenes
Gradle uses two main directories to perform and manage its work:
- Gradle user home directory: stores global configuration properties, initialization scripts, caches, and log files.
- Project root directory: contains all of your project’s source files, along with the directories Gradle generates — such as
.gradleandbuild.
Sometimes a cached dependency may have issues or may not update as expected. In the section Gradle-managed directories you can see common cache configurations and find some advice.
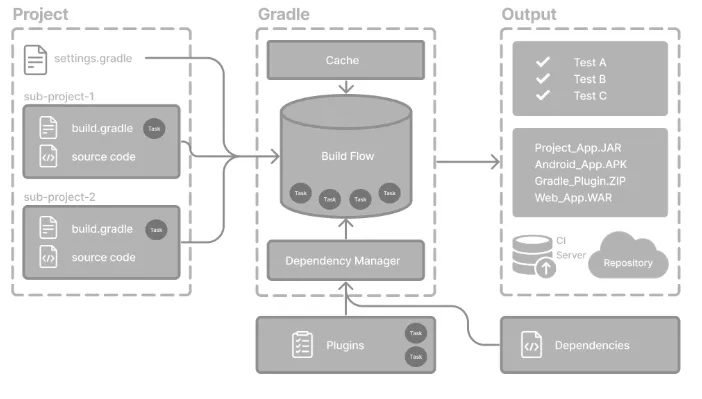
There are a few core concepts you need to know to work with Gradle:
- Projects — a piece of software that can be built (application / library).
- Build scripts — instruct Gradle which steps to take to build the project.
- Dependencies and dependency management — an automated technique for declaring and resolving external resources required by a project.
- Tasks — the basic unit of work, such as compiling code or running your tests. Each project contains one or more tasks defined inside a build script or a plugin.
- Plugins — plugins extend Gradle’s capabilities.
Taking all this into account, it’s also important to understand the build lifecycle so you can debug any unexpected behaviour in your project:
- Initialization — Gradle executes
settings.gradle(.kts)to determine which projects will be built and creates aProjectobject for each one. - Configuration — Gradle configures each project by running the corresponding
build.gradle(.kts)files. During this phase it resolves dependencies and builds a task-execution graph containing only the tasks required for the requested build. - Execution — Gradle runs the tasks specified on the command line, along with any prerequisite tasks their graph depends on.
Common Gradle files
gradle.properties
Gradle, system, and project properties can be found in the gradle.properties file; some props (like springBootVersion) are picked up by plugins, and the rest are your own values that other scripts will reuse later.
# Gradle properties
org.gradle.parallel=true
org.gradle.caching=true
org.gradle.jvmargs=-Duser.language=en -Duser.country=US -Dfile.encoding=UTF-8

# System properties
systemProp.pts.enabled=true
systemProp.log4j2.disableJmx=true
systemProp.file.encoding=UTF-8

# Project properties
kotlin.code.style=official
android.nonTransitiveRClass=false
spring-boot.version=2.2.1.RELEASE
settings.gradle
It defines the structure of the build, such as which projects are included. Without a settings file, Gradle treats the build as a single-project build by default.
rootProject.name = 'root-project'

include('sub-project-a')
include('sub-project-b')
include('sub-project-c')
build.gradle
A build.gradle file is your project’s recipe card for Gradle: it tells the build tool which plugins to apply, the dependencies to fetch, and the tasks and settings to run when you say gradle build.
plugins {
  id 'java'
}

allprojects {
    group = 'com.example'
    version = '1.0.0'

    repositories {
        mavenCentral()
    }

    tasks.register('helloWorld') {
        doLast {
            println 'Hello world from Gradle!'
        }
    }
}

subprojects {
    apply plugin: 'java'

    java {
        toolchain {
            languageVersion = JavaLanguageVersion.of(17)
        }
    }

    dependencies {
        implementation "org.jetbrains.kotlin:kotlin-stdlib:${kotlinVersion}"
        testImplementation 'junit:junit:4.13.2'
    }

    tasks.withType(JavaCompile) {
        options.encoding = 'UTF-8'
    }
}- Plugins: in this section we list the Gradle plugins we need.
- allprojects: the
allprojects {}block applies the same configuration to every module in the build. If you only have one module, you can leave this out — it won’t hurt anything, it just doesn’t add value. - subprojects: the
subprojects {}block is likeallprojects, but it targets only the child modules and leaves the root project alone.
Now, let’s analyze each specific part:
Repositories: inside the repositories {} block we tell Gradle where to look for dependencies — e.g., mavenCentral(), google(), or a private Maven repo.
mavenCentral()
maven {
    url = uri("https://company/com/maven2")
}
mavenLocal()
flatDir {
    dirs "libs"
}
Dependencies: inside the dependencies {} block we declare what our code (or other modules) needs. The most-used configurations look like this:
implementation project(":myProject")
compileOnly project(":myProject")
runtimeOnly project(":myProject")
testImplementation project(":myProject")
Tasks: Gradle tasks fall into two camps:
- Actionable tasks have some action(s) attached to do work in your build:
compileJava. - Lifecycle tasks are tasks with no actions attached:
assemble,build.
Typically, a lifecycle task depends on many actionable tasks, and is used to execute many tasks at once.
Useful Gradle properties
org.gradle.jvmargs=-Xmx3200m -XX:MaxMetaspaceSize=768m -XX:+HeapDumpOnOutOfMemoryError -Dfile.encoding=UTF-8
org.gradle.parallel=true
org.gradle.caching=true
org.gradle.configuration-cache=true
org.gradle.configuration-cache.parallel=true
org.gradle.configuration-cache.entries-per-key=2- Sets the JVM (Java Virtual Machine) arguments for the Gradle daemon.
- Enables parallel execution of tasks. Gradle will try to run tasks that don’t depend on each other at the same time, which can speed up builds on multi-core machines.
- Enables the build cache, which stores outputs from previous builds and reuses them when possible, reducing build time by avoiding unnecessary work.
- Enables the configuration cache, which caches the result of the configuration phase. This can greatly improve build startup time by skipping the configuration step when nothing has changed.
- Allows parallel configuration of included builds when using the configuration cache. This can further reduce configuration time in multi-build setups.
- Controls how many cache entries are kept per unique key in the configuration cache. Setting it to 2 means Gradle will keep up to 2 different cached configurations for each unique set of inputs.
Architecture with Gradle
As a software architect you can do multiple things with Gradle — from configuring a simple Gradle project, to setting up a multi-project build, and even designing a hexagonal architecture with restrictive access between layers (infrastructure, application and domain).
- Single-project builds include a single project called the root project.
- Multi-project builds include one root project and any number of subprojects.
Gradle’s docs already cover single and multi-project setups, so here I’ll focus on how to use them to wire up a hexagonal-architecture project.
If we have a project structure like this:
hexagonal-project
├── settings.gradle(.kts)
├── gradle.properties
├── build.gradle(.kts)
├── infrastructure
│   ├── infrastructure.gradle(.kts)
│   └── src
├── application
│   ├── application.gradle(.kts)
│   └── src
└── domain
    ├── domain.gradle(.kts)
    └── src
Our settings.gradle should be something like:
rootProject.name = "hexagonal-project"

include 'infrastructure', 'application', 'domain'

project(":infrastructure").buildFileName = "infrastructure.gradle"
project(":application").buildFileName = "application.gradle"
project(":domain").buildFileName = "domain.gradle"
In the infrastructure layer we can hide the domain API from direct imports: every adapter talks only through the contracts/ports declared in the application layer. That way compile-time classpaths keep the hexagonal boundaries intact.
// infrastructure.gradle
dependencies {
    implementation project(":application")
    runtimeOnly project(":domain")
}

// application.gradle
dependencies {
    implementation project(":domain")
}
When we think about implementing vertical slices, this feature becomes even more powerful, as we can separate our infrastructure components (database, network, third-party service adapters) and limit the communication between them. This way, if an adapter — for example, a Spring adapter — needs to access a persistence adapter, it is forced to communicate through our domain, preventing violations of the hexagonal architecture principles within our development team.
Conclusion
This article covers only a small part of Gradle’s many uses. Gradle offers a wealth of features and plugins — for example, publishing artifacts to private repositories such as Nexus to share common libraries, executing tasks in parallel across multi-project builds, running continuous builds that rerun your tests whenever a file changes, and much more.
Thank you for reading, and I hope this overview was helpful!